
How to make a Keyless Domain License System using Blogger

Protecting your premium elements or themes using the domain license system is one of the best ways to avoid leaking; however, the client-side scripts are always not 100% secure as you think. A domain-based license system helps to make your element or theme safe by verifying whether the domain exists or not in the post; if it does not exist, it redirects to the main domain with an alert message.
Using Blogger feeds, we can make a lightweight, simple and easy-to-manage keyless license system at no cost. It was suitable for anyone who needs a keyless license system for their elements or theme without any traditional database or external server. In this guide, we share with you how to make a keyless license system for your custom elements or themes.
We also try to make this guide simple and easy to understand step by step guide. Since it doesn’t use any server setup, it doesn’t require any big complex steps; you can authorise domains, like adding blog posts. So without wasting much time, let’s check how to implement this keyless domain license system in your custom element or template.
Requirement for this license system
- A Blogger account
- A public Blogger blog (For license post)
Features of this license system
- No license key required to be added by users
- Doesn’t require an external server
- Verified console message
- Invalid license alert with redirection
- Minimal code
- Easy to manage
How to add the Keyless Domain License System in Blogger
- First of all, create a separate blog for the license system in Blogger
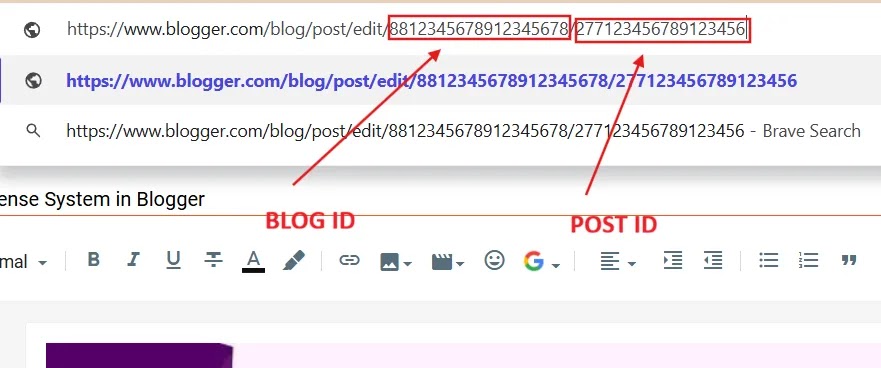
Getting BLOG ID and POST ID
- Create a blog post in it and open it
- Look at the post edit page address in the browser
- In the address bar, the first set of numbers is the blog ID, and the second set of numbers is the post ID. Note it anywhere
Adding a license system
- Go to the main JS of your custom element or theme
- Add the following JS just with the JS of your custom element or theme
/* ----
  Keyless Domain License System through Blogger
  Created by: coshix.in
  Source code: https://coshix.in/blog/keyless-domain-license-system-using-blogger
---- */
(function () {

  /* Demo configuration (replace with your own values) */
  var BLOG_ID = "[hl:blue]YOUR_BLOG_ID[/hl]";
  var POST_ID = "[hl:blue]YOUR_LICENSE_POST_ID[/hl]";

  function invalidLicense(){
    alert("License validation failed.");
  }

  function allowAccess(){
    console.log("[ul:green]License valid, Thanks for purchasing![/ul]");
  }

  function verifyLicense(){

    var domain = location.hostname.replace(/^www\./,'');
    var cb = "license_cb_" + Date.now();

    window[cb] = function(data){
      delete window[cb];

      var content =
        data &&
        data.entry &&
        data.entry.content &&
        data.entry.content.$t || "";

      var domains = content.split(/\n+/).map(function(v){
        return v.trim();
      });

      if(domains.indexOf(domain) !== -1){
        allowAccess();
      } else {
        invalidLicense();
      }
    };

    var s = document.createElement("script");
    s.src =
      "https://www.blogger.com/feeds/" +
      BLOG_ID +
      "/posts/default/" +
      POST_ID +
      "?alt=json-in-script&callback=" + cb;

    s.onerror = function(){
      console.warn("[ul:red]Network error, allowing access[/ul]");
    };

    document.body.appendChild(s);
  }

  if(document.body){
    verifyLicense();
  } else {
    document.addEventListener("DOMContentLoaded", verifyLicense);
  }

})();- Replace
YOUR_BLOG_IDwith your license blog ID and replaceYOUR_LICENSE_POST_IDwith your license blog post ID in the same blog - Obfuscate that mixed JS with any obfuscation tools like obfuscator.io
Blog Post Creation
- Now, go to the license post you created in your license blog
- Switch to HTML view
- Add license-validated domains one by one on that post in the recommended format given below.
<ol>

<li>yourdomain.com</li>
<li>second-domain.blogspot.com</li>
<li>subdomain.domain.com</li>

</ol>- Publish your license post
FAQ
What is the domain license system?
How does this Blogger feed-based license system work?
Does this license system require any external server?
Can we use this method for any website besides Blogger?
Conclusion
Keyless license system using this minimal JS is one of the easiest ways to protect your premium elements, themes or any other developer projects instead of relying on complex server setup, but I again repeat that the client-side method is not 100% secure like server-side setups. This method uses lightweight JS to manage authorised domains.
Using this method, provide a license to your elements, themes, or other projects’ users more easily, as you don’t need to make separate code for every user. You can share the same code with everyone, and you can manage license validation just by editing a blog post. This method is best for those who need a low-maintenance, free-of-cost and lightweight license setup.
After all this process, I again remind you to obfuscate your license mixed theme or element JS using any obfuscator tools like obfuscator.io, or else anyone can easily edit your premium code, which makes the license system useless. Hope this article helped you to implement a domain license system for your project. If you have any doubts related to this guide, then don’t forget to drop a comment below. Thanks for reading this guide.
Comments